Building a Timber Barn, continued
The Frame
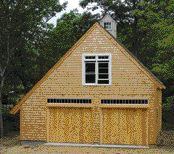
To achieve the right “look,” there’s no beating the tried-and-traditional materials. My frames are built from locally harvested and milled eastern white pine, which arrives at the site still green. Except for rare cases when the lumber comes from an unfamiliar sawmill, all of our framing stock is rough-sawn to full dimension. A 6×6 is literally 6 inches square, and my joists measure a full 2½ inches. Occasionally, but not often, I’ll have a client who wants the interior surfaces planed smooth, which requires a simple request to the sawmill and a material upcharge to the customer.
Walls are framed with 6×6 posts on 6- to 8-foot centers. We can spread or squeeze the layout to suit the overall wall length. The posts are tied at the top with a continuous 6×6 lintel.
Typically, we work with 12- to 14-foot-long posts and build a story-and-a-half balloon-framed wall with a level lintel around the full perimeter.
We lay all the posts on sawhorses for gang-cutting. Because the lengths are nominal and rough from the mill, the first task is to square-cut one end. At the ceiling level, typically 8 feet, we notch the exterior face of the posts to let in a 2×10 ledger board. The floor joists rest on that ledger and run to the center of the building span.
Between the mudsill and the lintel, we notch the posts to fit a 4×4 wall purlin. The purlin is typically located around 4 feet high on the wall and establishes the common windowsill height. This height provides uninterrupted wall area for installing a perimeter workbench.
No headers needed. With both the lintel and the joist ledger carrying overhead loads, individual window headers are unnecessary. Instead, we reinforce the opening cutouts with 4×4 jambs and a butt-fitted 4×4 header, both for appearance and to provide solid nailing for the exterior trim. We often use recycled divided-light wood sash in new pine frames. Not only does this provide the barn with the right look of Yankee make-do frugality, but I can get the sash free from a replacement window contractor.
Sometimes we let the posts run long and cut them in place. The clients may still be undecided about the second-story windows, preventing us from predetermining the required opening height, or the top of the foundation may be so uneven that it’s easier to stand the posts and trim the tops to a level line.
Girders. At the center of the second floor, we typically use a steel I-beam strongback to break the span. While steel isn’t a traditional barn-building material, it allows me to eliminate some of the posts required by a sawn wood girder. It’s also easier for us to work with than an engineered wood beam, because we don’t need multiple layers or metal joist connectors. Instead, the floor joists are nailed to a 2-by cleat set on the bottom beam flange and are secured by a 16d common nail driven down through the top flange. Predrilling the steel flange doesn’t take much effort; I have a helper do it. The end of the joist is notched around the top flange and is slightly higher than the beam, to allow for eventual drying shrinkage. Otherwise, the flooring will develop a hump over the girder. To minimize the appearance of the I-beam, we can easily veneer the sides and bottom with 1-by pine.
We set the 2½ floor joists on 2-foot centers. To create a stairwell, we leave one joist out, usually at the end of the run. After installing short, diagonal braces between every post and the 2×10 ledger to help stiffen the frame, we’re ready to install the 1×10 shiplap subflooring. Alan maps the layout from the center of the deck to ensure that a single board will bridge the steel I-beam. Beginning at one side of the deck, the first board is notched around the posts, and the rest of the floor is laid with butt joints staggered over joist centers. Flooring goes quickly, face-nailed with 3-inch common gun nails, two in the field and three at the butts.
Next, we set the 6×6 lintels, which are scribed in place over the posts, then notched to let in the posts.