
Q. Stick-framing an irregular hip or valley often calls for an acute compound bevel that exceeds the capacity of my circular saw. Instead of using a handsaw to make this cut, is there an easier way?
A. John Spier, a veteran carpenter who owns Spier Construction on Block Island, R.I., responds: The situation you’re referring to, framing irregular hips or valleys, calls for jack rafters that die into the sides of the hip or valley rafters. Jack rafters have compound cuts; that is, cuts that are both angled and beveled. The angles are plumb cuts, and the bevels are cut to the angle at which the jack rafters meet the hip or valley. A regular hip or valley has the same roof pitch on both sides, so the bevels are 45 degrees regardless of pitch. But an irregular roof has different pitches, so the bevel is less than 45 degrees on one side and greater than 45 degrees on the other.
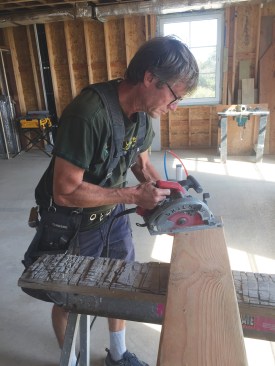
You can cut bevels up to 53 degrees or so with some saws, and I cheat that up to 60 degrees by tilting the saw base with my hand or a small stick. But many irregular roofs call for bevels of as much as 75 degrees. In my bad old days of production tract-house framing, we’d just cut a square plumb cut and side-nail it—perfectly strong and legal, but ugly. Here’s how I cut a serviceable compound bevel up to about 75 degrees with my circular saw. It’s not for amateurs, and it’s not very pretty, but the jack rafters look fine once they’re nailed up.
Start by cutting the plumb cut angle with the blade set to the complement of the desired bevel angle and in the opposite direction.

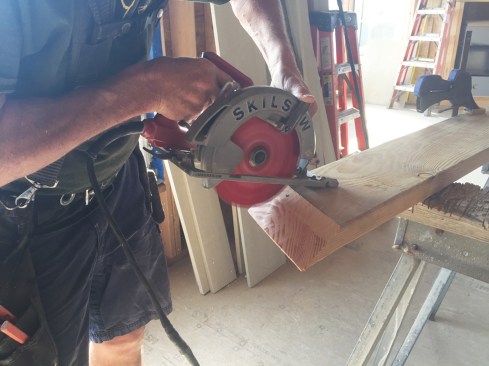
Next, scribe a line along the end cut about 1/4 inch from the short edge.
I start by marking and cutting the plumb cut angle, with a bevel the complement of the desired angle and in the opposite direction. In the photos above, I’m cutting a 20-degree bevel to get to 70 degrees. Next, I scribe a line along the end cut about 1/4 inch from the short edge (it’s OK to leave a little shoulder instead of a feather edge). After clamping the rafter up on edge, I cut along the line with the saw set square and to maximum depth, keeping the base flat on the bevel cut.

Using a straightedge, mark the rest of the cut.

Then make a shallow pass with the saw to remove most of the waste.
Finally, carve down to the line with a series of sliding cuts, moving the saw sideways across the face of the bevel and not taking too much off at once.
This cut won’t go all the way through, so then I mark the rest of the cut around the edges and across the other side, and rough-cut most of the waste off. Finally, holding the blade guard up, I plant the front of the base firmly on the rafter and carve down to the line with a series of sliding cuts, moving the saw across sideways and not taking too much off at once. With practice, it’s possible to make a smooth, flat surface in about 20 seconds.