
In Part One of Klee Talks Kitchens, I touched on the tools and techniques I use to lay out and install my kitchens. Here, I’ll get into the weeds on getting the trim and handle hardware to look just right along with some site-made fixes that are part and parcel with kitchen installs—no matter how detailed the design.
Trim Tricks
Trim like crown and light rail always finishes off cabinets nicely. For multi-piece trim assemblies, I like to build as much as I can on a work table to keep miters tight and aligned, especially when a ceiling isn’t perfectly flat. Using a 23-gauge pin nailer to fasten corners keeps the nail holes small. For no nail holes, you can use FastCap 2p10 glue, which is a fast-setting, two-part super glue that cures in just seconds. It’s difficult to use because of the quick set-up time, so practice on scrap before using it on kitchen trim.
Nail Holes
After install, it’s time to fill the nail holes—everyone’s least favorite job. I’ve found that warming up the wax stick makes it easier to place. You can hit it with a heat gun for a few seconds or put it in a microwave or even under an incandescent light bulb (if you can find one). Cutting down a Bondo spreader card makes a great putty knife for working the wax into the nail hole and removing the excess. Keeping the tool clean will be the difference between a nice, neat job and a mess on the crown, so have some rags on hand. When you’re done with a section, a little cleaner or paint thinner on a clean rag will remove residue and smudges.
Hardware
Kitchen hardware can be one of those tasks that people dread doing. Measuring out every knob and handle and doing all that math. It’s not fun—and there’s a lot on the line if you get it wrong.
To lay out the drawers, I use green Frog Tape on the drawers, then mark them. I then compare my marks to the hardware to make sure it looks right, double check everything. Only then do I drill.
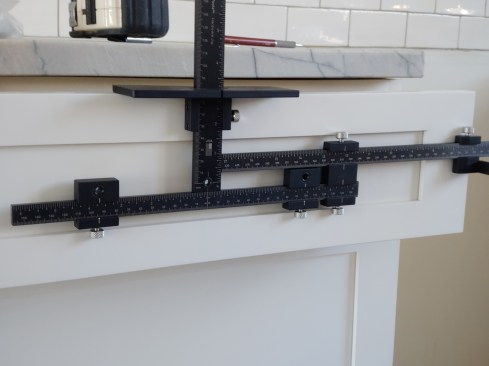
The True Position 1935 is a layout master. It saves the author hours—many of them—per kitchen. It is also saving him energy that he can use to solve other problems.
Recently, I started looking at jigs to speed this process up. Nothing I saw worked for what I needed, until I saw the True Position 1935. After using it for one kitchen, I am comfortable saying that using this jig will save you time and improve accuracy like nothing else. Once you learn the set-up process, which is easy, you’ll be able to set up and drill whole kitchens in an hour or two, instead of most of the day. Of course, you have to adjust the doors and drawers as you go, and I highly recommend getting a proper posi- drive screw driver so you don’t strip the screws on the hinges and slides with a regular #2 Phillips. I personally use a Blum posi screw driver, but many other companies make them, and even make bits for drills.
Making the Most of Mistakes
Even with all these great tips and tricks, mistakes will happen. Sometimes it’s a math error, a measurement error, or just a bad drawing (or a good drawing with an old note that didn’t get erased).
I used to be paranoid about the handles and knobs, but the True Position jig frees up some brain space to solve other problems, like what seems to be my annual misdrilling of cabinets for plumbing.
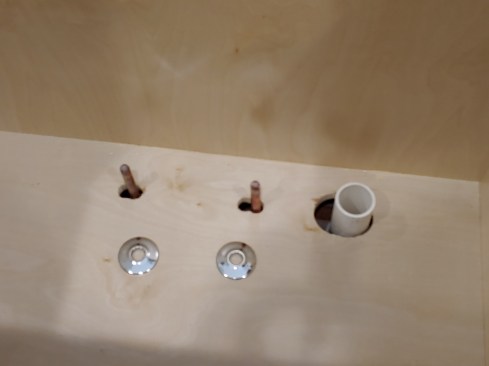
The plan called for 1/4-inch panels, so that’s how the author laid out and drilled for the plumbing.
For the fix, I usually cover the back panel with a piece of ¼-inch pre-finished maple plywood and then drill the holes correctly. This works on bottoms of face-frame cabinets also.
But what if it’s a frameless cabinet with no edge to hide the end of the plywood? In the case of my latest oops, I had to move an island to account for new end panels. See, I thought they were ¼ inch, but I was wrong by ¾ inch. They were 1-inch panels.
It turned out that the plans were incorrect and the end panel was an inch, not 1/4 inch, which resulted in misdrilled plumbing holes. A wood trim ring corrected for the error.
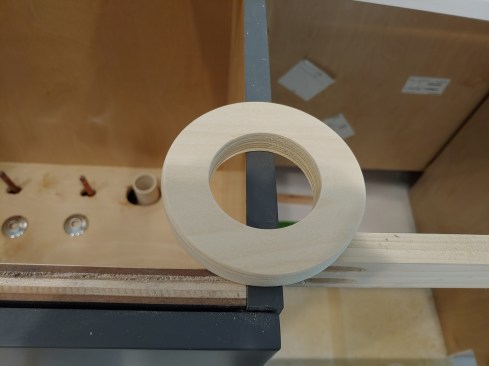
I couldn’t find a metal ring so I made a wood trim ring for the 2-inch sink drain instead. I used a 4 1/2-inch hole saw to cut the outside (OD) out of a piece of 1-by. Then I used a 3-inch hole saw for the inside ring (ID). Next, I ran it through the planer to knock it down to 3/8 inch thick and hit it with some clear coat to seal it up.
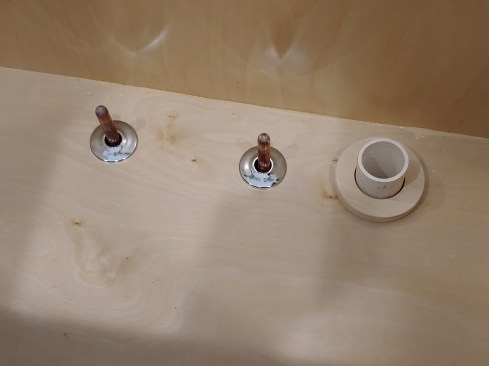
Sometimes, the best thing to do in the case of a misdrill is to fabricate an escutcheon, which the author did here with a piece of 1-by and a couple of hole saws. He trimmed it down in the planer to about 3/8 inch and zapped it with clear coat. Problem solved.
If the misdrill is too big to fix with trim rings, I make a new bottom, which has to happen before the plumbing is done (so you can get the piece over the pipes). In that case, I would either sand the front edge and round it then put some poly on it to seal it, or edge band it and trim it.
These tips and tricks make installing kitchens easier, more efficiently, and more accurately. That ultimately leads to better profits, not to mention more enjoyment in setting kitchens. And in the end, isn’t that the goal?
Photos by Chris Klee