Roof-to-Wall Transitions
According to the roofing-association manuals, roofing should lap up the wall at least 8 inches at roof-to-wall intersections. In practice, we’ve had good results with a 4-inch lap, but any lower than that is taking a risk.
When we attach to solid masonry, we generally use a termination bar—a strong piece of metal that we fasten into the wall, that clamps the roofing to the wall. We seal the top of it with sealant, and then on top of that, we add another flashing that is set into a 3/4-inch kerf cut into the masonry—deep enough to keep the metal from working itself out of the kerf with expansion and contraction as it heats up or cools off.
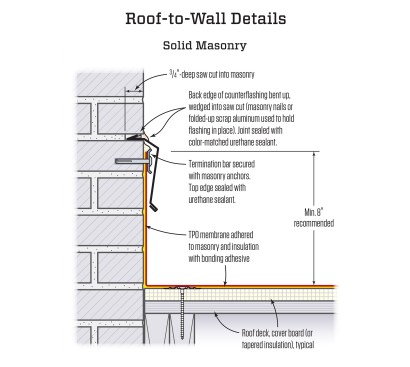
For solid masonry, the author recommends running the membrane 8 inches up the wall. The membrane is secured at the top with a termination bar and counterflashed.
With brick veneer, you can’t just kerf into the wall and embed a flashing in this way. Instead, you have to install a through-flashing into the veneer that goes all the way back to the wall and ties into the drainage plane.
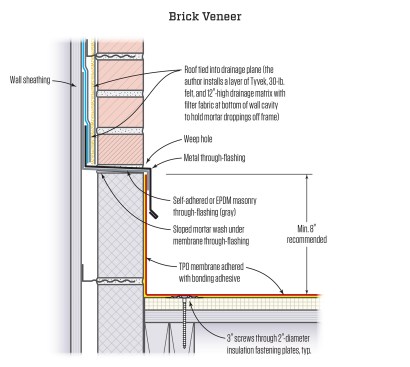
Masonry veneer requires a through-flashing that ties into the weather-resistive barrier behind the masonry.
Under siding, it’s enough to run the roofing up the wall and apply flashing over the roofing. Be sure to allow enough clearance between the siding and the roof to allow for reworking the roof in the future.
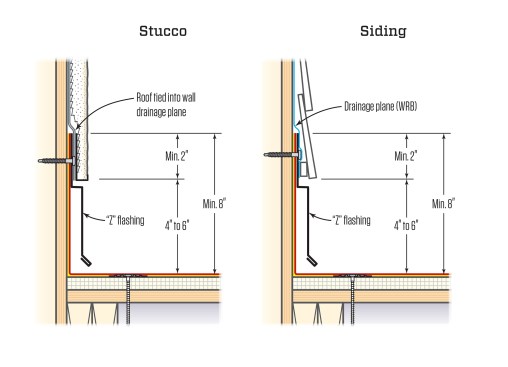
To tie the roofing into stucco or lap siding, the author recommends a “Z” flashing that laps under the weather-resistive barrier.
Parapets
Parapet walls and skylight curbs are similar elements that receive very similar treatment. The pieces of metal on top of parapet walls are not sufficient to keep water out of the assembly, because they develop leaks at the joints due to expansion and contraction. So it’s important to run the roof membrane up the parapet, over it, and down onto the other side, and then cap that with the metal.
In an ideal world, you would even slope the top of the parapet a little bit so that water that makes it onto the membrane will run off instead of pooling. Once the membrane is wrapped over the parapet, the metal piece is essentially decorative.
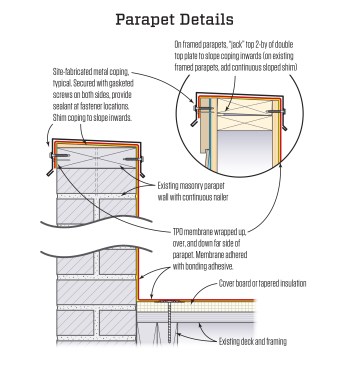
When roofing wraps up and over the top of a parapet wall, waterproofing the coping or trim is less critical.
It is possible to make a completely open edge, but still have a parapet wall. We often install the parapet wall on posts, where the wall ends about 4 inches above the roof, providing a continuous space for drainage. It’s easier to detail—you don’t have all the complex origami that flashing in a conventional scupper requires—and it’s much harder to clog. You can’t really see it from outside, because the gutter hides the view of the opening. If you need to have a parapet wall, I think that is the way to do it.
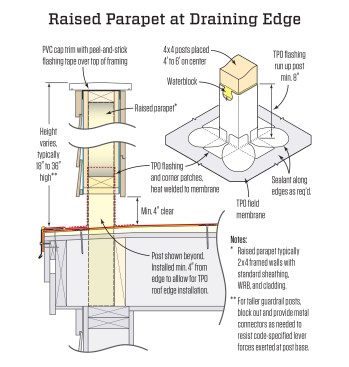
For optimum drainage at the roof’s lowest edge, the author prefers a parapet raised on posts as shown above, with the post bases wrapped in membrane. The tops of parapets should be shimmed for slope to prevent standing water from collecting.
Skylight Curbs
Skylight curbs are similar to parapets. The membrane roofing should lap up onto the skylight curb and over it. The curb should be pitched to the outside for drainage. Air-sealing between the skylight unit and the curb is an often-neglected detail that we try to pay attention to, because if there’s a gap and the wind is blowing the wrong way, it will suck water right through it.
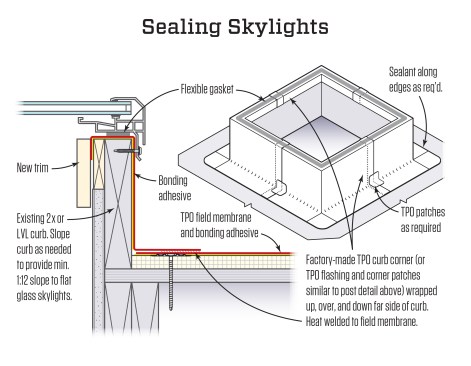
Preformed skylight curb corners help with wrapping membrane up and into the skylight curb. Skylights should be gasketed to block the intrusion of wind-blown water.