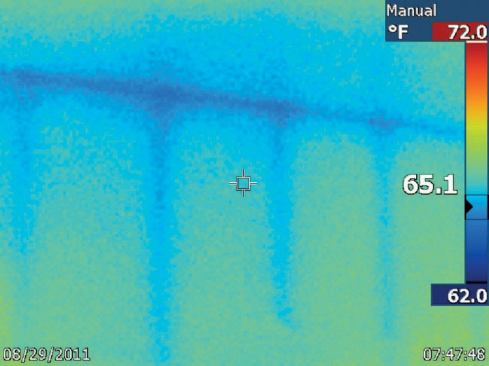
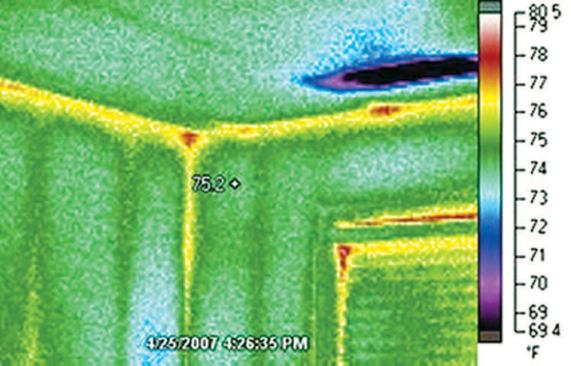
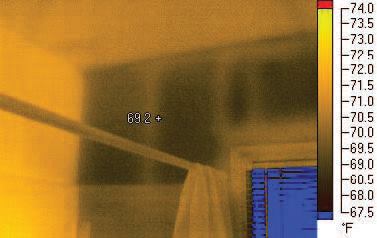
This image was taken when the local delta-T was low. The wall fr…
Understanding Heat Flow and Delta-T
To perform a successful building inspection, it’s best to have a minimum, stable temperature difference of 10°C – or about 18°F – between indoor and outdoor surfaces. That’s because the kinds of things we’re usually looking for, like missing insulation or air leaks in the building envelope, require a sizeable thermal “driver” to show up in an IR image. In energy-wonk shorthand, that temperature difference across the building envelope is known as its delta-T.
Why is delta-T so important? Imagine a situation in which the air temperature both indoors and out is exactly 70°F, and has been for so long that the entire mass of the building has settled at the same temperature.
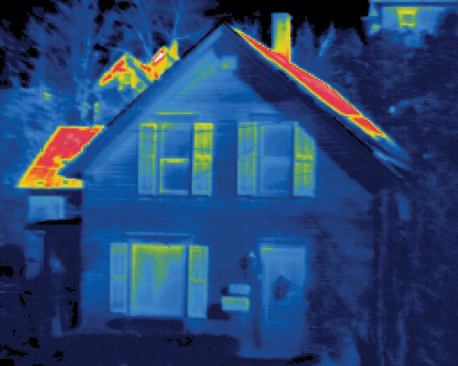
Under those conditions, there’s basically no heat transfer. An infrared image will tell you next to nothing about the structure, because there are no significant variations in surface temperature for the camera to detect. But with a large delta-T – as you’d find on a cold winter morning when the heat in the house has been on all night – framing, insulation, and other features of the structure are likely to stand out clearly.
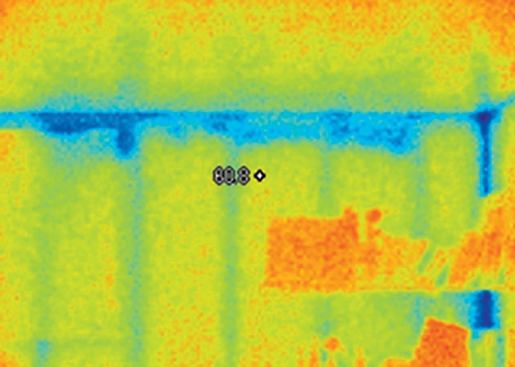
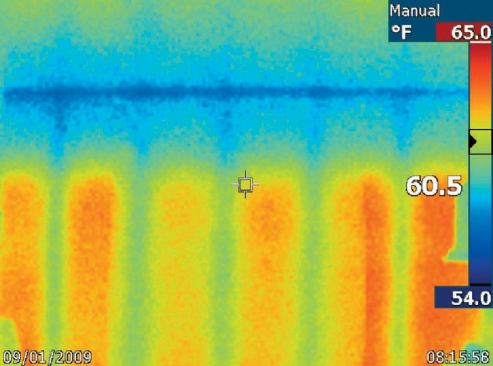
Look for framing. A rough rule of thumb for deciding whether there’s an adequate delta-T is to look for evidence of framing. Because the studs in a wall conduct heat much better than the cavity insulation, they’ll ordinarily show up as significantly warmer when imaged from the cool side of the wall, or cooler when viewed from the warm side. In an uninsulated building, that pattern will (ordinarily) be reversed, because the open framing cavities will provide even less resistance to the passage of heat than the framing. If you can’t see the framing at all, conditions are inadequate for you to see problems.
There are also anomalies that are worth noting. For example, regardless of delta-T, it may be difficult or impossible to see the framing in superinsulated houses or other unconventional structures.
Stretching the Working Year
The good news is that even with mid-priced equipment, you should be able to get good-quality images about 300 days out of the year if you properly select the time and conditions. With a higher-priced camera, you’ll be able to image at some time nearly every day, under a wider range of conditions.
In the swing seasons (fall and spring), for instance, you may need to arrive early in the morning at home that’s been closed up all night. Under those circumstances you’re more likely to find good “winter imaging” conditions, where the interior surfaces are warm and the outdoor surfaces cooler. If you schedule an inspection visit for late afternoon or early evening – again, assuming that the house has been closed up all day – you can often perform an excellent round of “summer imaging,” with the interior cooler than the out-of-doors. Timing your visits this way won’t always pan out; you may find when you arrive that you have to reschedule for another time, but it’s often worth a try.
Another trick is to temporarily boost the delta-T by “pulsing” the heating or air-conditioning for 15 or 20 minutes, then waiting another 15 to 20 minutes for the interior temperature to change. This can work well, but it can be troublesome at times, because hvac systems don’t adjust the temperature uniformly everywhere. Some envelope surfaces may be flooded with warm or cool air, while others – where furniture is pushed up against a wall, for example – may remain almost unchanged. In these cases imaging should be done from the interior only.
Solar confusion. A potentially major complication is the heating of the sun. Inside and out, in both summer and winter, too much sun can wreak havoc on otherwise acceptable conditions. Direct sunlight will quickly make exterior inspection work impossible by heating surfaces enough to overwhelm the subtle temperature differences that result from heat transfer through the building envelope.
Retreating to the inside may help, but the effect of the sun will show up there too – although delayed somewhat – with potentially confusing results. Thanks to a phenomenon known as capacitance – essentially the difference between various materials’ capacities to change temperature – problems can persist well into the evening, long after you might imagine solar loading could possibly be an issue.
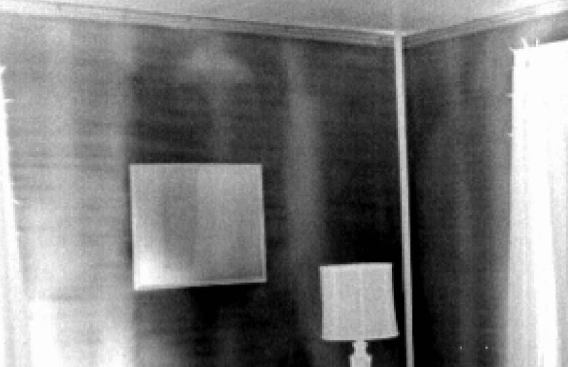
A little knowledge is a dangerous thing. I still wince at the memory of a winter evening early in my career when I’d been called in to confirm that a newly constructed cathedral ceiling had been properly insulated. Looking through the viewfinder at the north-facing side of the ceiling, I could see the expected pattern: The rafters clearly stood out as cooler than the framing cavities, indicating to me that they were conducting more heat to the outdoors than the insulated cavities. On the south side of the room, though, the picture was exactly the opposite: The cavities looked cooler than the rafters, which I took to mean that the rafter bays were uninsulated, allowing them to lose heat to the outdoors faster than the surrounding lumber.
I confidently announced to the owner that the south side of the ceiling was not insulated. The contractor – who happened to be standing next to me at the time – thought about that for a few seconds, then reached up and jabbed his hammer through the drywall in the “uninsulated” half of the ceiling, revealing the fiberglass beneath. “I insulated both sides,” he said mildly.
Where did I go wrong? I eventually figured out that all through that winter day, direct sun beating on the south side of the roof had actually been pumping heat into the structure. That reversed the usual wintertime heat flow, causing the south-facing ceiling to radiate heat into the room, especially at the framing members, which have less thermal resistance than insulation. After sunset, the insulation and drywall – having little thermal mass – cooled to room temperature more quickly than the lumber, which retained its heat long enough for me to put my foot in my mouth.